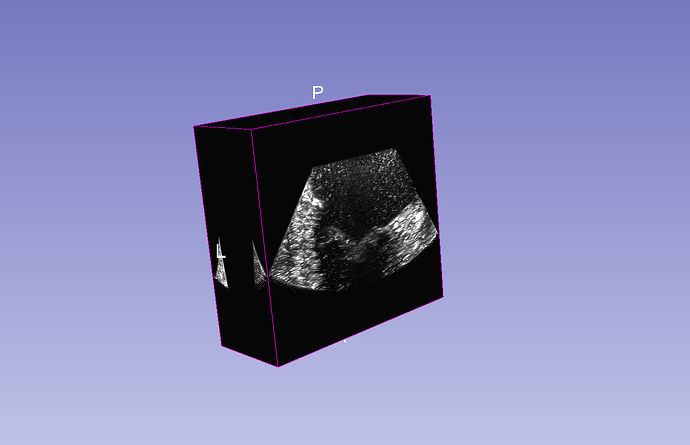
Segmentation of Mitral valve

Hi to everyone.
I’m new to 3D Slicer. I have a sequence of Cine-MRI images of 18 evenly rotated long-axis (one every 10°) planes around the axis passing through the annular center of the mitral valve and aligned with the left ventricle. So i have only 2D slices in time.

My question if in Slicer 3D it is possible to segment for example the mitral valve starting from this kind of acquisition.

To better understand i have attached two images representing of my Cine-MRI Images acquisition protocol.

Any help would be appreciated.

Thanks.
Pic

We do a lot of heart valve and leaflet segmentations on various imaging modalities (ultrasound, MRI, CT), so we should able to help with this.

There are a few options for segmenting the leaflets from such time series:

A. Reconstruct volume(s) from the slices. SlicerIGT extension can reconstruct a Cartesian volume from a set of arbitrarily oriented slices and then you can segment the leaflets as usual (using Segment Editor module). This may require conversion of input MRI into a format that the volume reconstructor module can interpret, which may not be as trivial so if you want to try this option then we would probably need a sample data set (it can be taken of a phantom or any other object, you just need to use the exact same imaging protocol as for patient images).

B. Segment individual frames. Create an empty segmentation and segment the leaflet in each slice. This requires that you load the DICOM series as a “volume sequence”. By default it may be loaded as “multi-volume” in that case you need to change the default setting in menu: Edit / Application settings / DICOM.

C. You may be able to load it as a scalar volume, as the loader supports image interpolation between arbitrarily oriented slices. You need to split the series by content time (an option that you need to enable in Application settings), and then choose the time points you want to load in DICOM module (by enabling “Advanced” option).

None of these options are completely straightforward to learn but they should work well. You can either experiment with them on your own (and we help with advice when you get stuck), or you can share a data set and we figure out what works best and give you step-by-step instructions that you can follow.

1 Like

Hi @Iassoan,

Thank you very much for your answer and for providing me with 3 different strategies.
I start immediately with trying them.
In the meantime, I share a OneDrive link to the Cine-MRI images I refer to.

Thanks again

Link: (link is removed due to potentially containing patient identifiable information)

Lorenzo

I had a look at the data set and tried all 3 methods.

Method C does not work because slices intersect each other and therefore cannot be interpolated using a grid transform.

Method B somewhat worked (I had to slightly improve the DICOM importer, the update will be available in tomorrow’s Slicer Preview Release). Since the the volume is quite sparse and the leaflet visibility is not always great, segmenting the leaflets like this can be quite challenging (you need to keep browsing the slices to get the necessary spatial and temporal context for interpreting the current slice).

Method A seems to be the most promising. Volume reconstruction module in SlicerIGSIO extension can manage to fill in the gaps between the slices and creates a full 3D volume, which can be visualized directly using volume rendering, segmented using the common segmentation tools, etc.

This is how the reconstructed 4D volume sequence looks like:

Farther from the mitral vale the gap between slices becomes too large, the holes cannot be filled anymore, but that could be addressed by changing the reconstruction parameters (and probably those areas are not interesting anyway).

You need to reconstruct the frames in groups, which requires reorganizing the sequence. Doing this manually for hundreds of frames would takes tens of minutes, so I wrote a script to automate this. You can load the MRI image series, define a ROI box to define where you want to reconstruct the volume, and run this script to get the result that is shown in the video above. It requires Slicer Preview Release downloaded tomorrow or later and installation of SlicerIGSIO and SlicerIGT extension.

# Set inputs
inputVolumeSequenceNode = slicer.util.getFirstNodeByClassByName('vtkMRMLSequenceNode', 'Sequence')
inputVolumeSequenceBrowserNode = slicer.modules.sequences.logic().GetFirstBrowserNodeForSequenceNode(inputVolumeSequenceNode)
inputVolumeSequenceBrowserNode = slicer.mrmlScene.GetFirstNodeByClass('vtkMRMLSequenceBrowserNode')
roiNode = slicer.util.getNode('R')  # Draw an Annotation ROI box that defines the region of interest before running this line
numberOfTimePoints = 30
numberOfInstancess = 540
startInstanceNumbers = range(1,numberOfTimePoints+1)

# Helper function
def reconstructVolume(sequenceNode, roiNode):
    # Create sequence browser node
    sequenceBrowserNode = slicer.mrmlScene.AddNewNodeByClass('vtkMRMLSequenceBrowserNode', 'TempReconstructionVolumeBrowser')
    sequenceBrowserNode.AddSynchronizedSequenceNode(sequenceNode)
    slicer.modules.sequences.logic().UpdateAllProxyNodes()  # ensure that proxy node is created
    # Reconstruct
    volumeReconstructionNode = slicer.mrmlScene.AddNewNodeByClass("vtkMRMLVolumeReconstructionNode")
    volumeReconstructionNode.SetAndObserveInputSequenceBrowserNode(sequenceBrowserNode)
    proxyNode = sequenceBrowserNode.GetProxyNode(sequenceNode)
    volumeReconstructionNode.SetAndObserveInputVolumeNode(proxyNode)
    volumeReconstructionNode.SetAndObserveInputROINode(roiNode)
    volumeReconstructionNode.SetFillHoles(True)
    slicer.modules.volumereconstruction.logic().ReconstructVolumeFromSequence(volumeReconstructionNode)
    reconstructedVolume = volumeReconstructionNode.GetOutputVolumeNode()
    # Cleanup
    slicer.mrmlScene.RemoveNode(volumeReconstructionNode)
    slicer.mrmlScene.RemoveNode(sequenceBrowserNode)
    slicer.mrmlScene.RemoveNode(proxyNode)
    return reconstructedVolume

# This will store the reconstructed 4D volume
reconstructedVolumeSeqNode = slicer.mrmlScene.AddNewNodeByClass('vtkMRMLSequenceNode', 'ReconstructedVolumeSeq')

for startInstanceNumber in startInstanceNumbers:
    print(f"Reconstructing start instance number {startInstanceNumber}")
    slicer.app.processEvents()
    # Create a temporary sequence that contains all instances belonging to the same time point
    singleReconstructedVolumeSeqNode = slicer.mrmlScene.AddNewNodeByClass('vtkMRMLSequenceNode', 'TempReconstructedVolumeSeq')
    for instanceNumber in range(startInstanceNumber, numberOfInstancess, numberOfTimePoints):
        singleReconstructedVolumeSeqNode.SetDataNodeAtValue(
            inputVolumeSequenceNode.GetDataNodeAtValue(str(instanceNumber)), str(instanceNumber),)
    # Save reconstructed volume into a sequence
    reconstructedVolume = reconstructVolume(singleReconstructedVolumeSeqNode, roiNode)
    reconstructedVolumeSeqNode.SetDataNodeAtValue(reconstructedVolume, str(startInstanceNumber))
    slicer.mrmlScene.RemoveNode(reconstructedVolume)
    slicer.mrmlScene.RemoveNode(singleReconstructedVolumeSeqNode)

# Create a sequence browser node for the reconstructed volume sequence
reconstructedVolumeBrowserNode = slicer.mrmlScene.AddNewNodeByClass('vtkMRMLSequenceBrowserNode', 'ReconstructedVolumeBrowser')
reconstructedVolumeBrowserNode.AddSynchronizedSequenceNode(reconstructedVolumeSeqNode)
slicer.modules.sequences.logic().UpdateAllProxyNodes()  # ensure that proxy node is created
reconstructedVolumeProxyNode = reconstructedVolumeBrowserNode.GetProxyNode(reconstructedVolumeSeqNode)
slicer.util.setSliceViewerLayers(background=reconstructedVolumeProxyNode)
slicer.modules.sequences.showSequenceBrowser(reconstructedVolumeBrowserNode)
2 Likes

Dear @lassoan,

Thanks a lot for the your help. In these days i will try to follow your instructions and i will let you know.

Thank you again

Lorenzo

Dear @lassoan,

I tried Method A and by means of your instructions i was able to run the script you wrote. However when Slicer stops to run the script, my output named ‘ReconstructedVolumeSeq’ represents only a 3D volume, fixed at a precise time instant.

My question is: how can i obtain the 4D volume similar to the one rapresented in the Youtube video you loaded in the last answer?

P.S. i want to specify that the version of Slicer i am using is the 4.13: The ‘unstable version’, downloanded yesterday.

I want to thank you very much for your help

Lorenzo

You can play/pause/browse 4D volume sequences using Sequences module or using the Sequence browser toolbar (if this toolbar is not shown then click on “Sequence browser” in View / Toolbars menu).

Dear @lassoan,

Thank you very much, it works

1 Like

Hi,I have something problem like this.I have a series of images(png format) which were captured by rotating long-axis(one every 1°).And I want to recontruct the mitral valve volume by these images in the 3D slicer.But when I import these images and turn on the volume rendering ,I found something wrong like below.

My question is how can I recontruct the volume by these images like you do this.Can you give me some instruction.I have tried to use the script that you provide but I have something confused about it.

I have shared the images to the onedrive.
link:Microsoft OneDrive

Thanks.

You can reconstruct volume from these 2D ultrasound rotational sweep very similarly to the cine MRI above.

Result:

Script that reorganizes the volume into a sequence of frames, adds position&orientation information to each frame, and reconstructs a volume:

# Input 3D volume that contains each frame as a slice
inputFrameVolumeNode = slicer.mrmlScene.GetFirstNodeByClass('vtkMRMLVolumeNode')
imageSpacingMm = 0.2  # this needs to be replaced with the actual spacing
outputSpacingMm = imageSpacingMm * 1.0  # Make the reconstructed volume spacing larger to reduce memory usage and make computations faster

# Get volume size
inputFrameVolume = inputFrameVolumeNode.GetImageData()
extent = inputFrameVolume.GetExtent()
numberOfFrames = extent[5]-extent[4]+1

# Set up frame geometry and rotation
centerOfRotationIJK = [(extent[0]+extent[1])/2.0, extent[2], 0]
rotationAxis = [0, 1, 0]
rotationDegreesPerFrame = 180.0/numberOfFrames

# Convert RGB/RGBA volume to grayscale volume
if inputFrameVolume.GetNumberOfScalarComponents() > 1:
    componentToExtract = 0
    print(f"Using scalar component {componentToExtract} of the image")
    extract = vtk.vtkImageExtractComponents()
    extract.SetInputData(inputFrameVolume)
    extract.SetComponents(componentToExtract)
    extract.Update()
    inputFrameVolume = extract.GetOutput()

# Create an image sequence that contains the frames as a time sequence
# and also contains position/orientation for each frame.
outputSequenceNode = slicer.mrmlScene.AddNewNodeByClass("vtkMRMLSequenceNode", inputFrameVolumeNode.GetName()+"_frames")
outputSequenceNode.SetIndexName("frame")
outputSequenceNode.SetIndexUnit("")

# This temporary node will be used to add frames to the image sequence
tempFrameVolumeNode = slicer.mrmlScene.AddNewNodeByClass("vtkMRMLScalarVolumeNode")

for frameIndex in range(numberOfFrames):
    # set current image from multiframe
    crop = vtk.vtkImageClip()
    crop.SetInputData(inputFrameVolume)
    crop.SetOutputWholeExtent(extent[0], extent[1], extent[2], extent[3], extent[4] + frameIndex, extent[4] + frameIndex)
    crop.ClipDataOn()
    crop.Update()
    croppedOutput = crop.GetOutput()
    croppedOutput.SetExtent(extent[0], extent[1], extent[2], extent[3], 0, 0)
    croppedOutput.SetOrigin(0.0, 0.0, 0.0)
    tempFrameVolumeNode.SetAndObserveImageData(croppedOutput)
    # set current transform
    ijkToRasTransform = vtk.vtkTransform()
    ijkToRasTransform.Scale(imageSpacingMm, imageSpacingMm, imageSpacingMm)
    ijkToRasTransform.RotateWXYZ(frameIndex * rotationDegreesPerFrame, *rotationAxis)
    ijkToRasTransform.Translate(-centerOfRotationIJK[0], -centerOfRotationIJK[1], -centerOfRotationIJK[2])
    tempFrameVolumeNode.SetIJKToRASMatrix(ijkToRasTransform.GetMatrix())
    # add to sequence
    added = outputSequenceNode.SetDataNodeAtValue(tempFrameVolumeNode, str(frameIndex))

slicer.mrmlScene.RemoveNode(tempFrameVolumeNode)

# Create a sequence browser node for the reconstructed volume sequence
outputSequenceBrowserNode = slicer.mrmlScene.AddNewNodeByClass(
    'vtkMRMLSequenceBrowserNode', outputSequenceNode.GetName() + '_browser')
outputSequenceBrowserNode.AddSynchronizedSequenceNode(outputSequenceNode)
slicer.modules.sequences.logic().UpdateAllProxyNodes()  # ensure that proxy node is created
outputSequenceProxyNode = outputSequenceBrowserNode.GetProxyNode(outputSequenceNode)
slicer.util.setSliceViewerLayers(background=outputSequenceProxyNode)
slicer.modules.sequences.showSequenceBrowser(outputSequenceBrowserNode)

# Make slice view move with the image (just for visualization)
driver = slicer.modules.volumereslicedriver.logic()
redSliceNode = slicer.util.getFirstNodeByClassByName("vtkMRMLSliceNode", "Red")
driver.SetModeForSlice(driver.MODE_TRANSVERSE, redSliceNode)
driver.SetDriverForSlice(outputSequenceProxyNode.GetID(), redSliceNode)


# Reconstruct
volumeReconstructionNode = slicer.mrmlScene.AddNewNodeByClass("vtkMRMLVolumeReconstructionNode")
volumeReconstructionNode.SetAndObserveInputSequenceBrowserNode(outputSequenceBrowserNode)
volumeReconstructionNode.SetAndObserveInputVolumeNode(outputSequenceProxyNode)
volumeReconstructionNode.SetOutputSpacing(outputSpacingMm, outputSpacingMm, outputSpacingMm)
volumeReconstructionNode.SetFillHoles(True)
slicer.modules.volumereconstruction.logic().ReconstructVolumeFromSequence(volumeReconstructionNode)
reconstructedVolume = volumeReconstructionNode.GetOutputVolumeNode()
reconstructedVolume.SetName(outputSequenceProxyNode.GetName()+"_recon")
roiNode = volumeReconstructionNode.GetInputROINode()
# Cleanup
slicer.mrmlScene.RemoveNode(volumeReconstructionNode)
# Show reconstruction result
roiNode.SetDisplayVisibility(False)
slicer.util.setSliceViewerLayers(background=reconstructedVolume,fit=True)
2 Likes

Thank you so much ,it works well.

1 Like

Hello,

This community is wonderful and the tutorials and feedback regarding questions have been great. I have a similar question to others in the community working with Cine MRI imaging, but have not had success troubleshooting based on the community responses. I would like to create a segmentation of a specific cardiac phase (time point in the cardiac beat) using cine MRI data.

When I load the cine sequence, it results in (what has been described by other Slicer responses) as the standard way cine MRI files are viewed in Slicer. Is there a way in Slicer to have the program bring up three 2D images in the viewing window at a given time point as happens in a static (non 4D) cross sectional volume? …and then allow me to segment/seedgrow at one time point?

I attempted to follow the advice above including A, B, and C without much luck. I was able to start to Paint after I changed the DICOM settings from Multivolume to Sequence, but I cannot Paint more than one slice at a time (see image below). Some of the visualizations in that last video are impressive, but I cannot replicate them. See the picture below for what I see and please let me know if the recent iterations of Slicer have the tools built in to perform segmentation on cine 4D images.

Appreciate it, -Ray

Have you acquired a time sequence of a 3D volume, or a time sequence of a 2D slice?

Have you managed to reconstruct a 3D volume?

It is a 3D cine MRI of the heart with 15 slices in this instance, each with 30 phases. Thank you for your help with this.

Have you managed to reconstruct 3D volume for each phase? If not, how far did you get? What problems did you run into? Could you hate an anonymized data set?

Although segmenting all the phases (time points) within each slice would be useful for creating a moving 3D segmentation, I really only wish to segment the same phase (time point) within each slice to create a segmentated volume of (for example) cardiac diastole. My image above shows my attempt to do this… Slicer would not let me paint outside a single slice. I wish to do this with our cine MRI bc the contrast between the blood pool and tissue is excellent and it would allow segmentations of multiple cardiac cycles for comparison and other post processing.

I can try to send an anonymized data set, but would need to send it to a secure email address. Please DM me at @DrBabyHearts on Twitter. Thanks.

You can send me a direct message here (click on my name and then the message icon).

I’ve added a module to SlicerHeart extension: Reconstruct 4D cine-MRI. This module provides a convenient GUI for the 4D Cartesian volume reconstruction, so Python scripting is no longer needed. It’ll be available in the latest Slicer Preview Release that you download tomorrow or later.

1 Like

Thank you very much… above and beyond as usual. I will let you know how it goes.

1 Like

Hello again Slicer Community, I tried the Reconstruct 4D cine-MRI module shortly after the 4.13 build came out, but noted that I could not load the required extensions. I just tried it again and am having the same issues. Specifically, if I try to download SlicerHeart or IGSIO from the “Install Extensions” tab I get the error: “Failed downloading: https://slicer.packages.kitware…”. Then, if I try to “Restore Extensions” (they are both in this list) and select one or both of these extensions, nothing seems to happen when I click “Install Selected” and if I try to exit, I get the message “Install/uninstall operations are still in progress…” even after I wait about two hours. The “Reconstruct 4D cine-MRI” module is therefore not available for use in my install of 4.13.

Troubleshooting to-date: Uninstalling 4.11 and 4.13, restarting my computer, and re-installing 4.13 did not solve the problem. Being on a different network did not solve it either. When I reverted to 4.11, I can reinstall the extensions, but I obviously get an error message when I try to use the “Reconstruct 4D cine-MRI” module (Error: “This module requires Slicer core version Slicer-4.13…”). I have tried installing 4.13 on three machines, one of which never had any version of 3D Slicer installed on it previously.

Have others had this issue? Is there a fix? Thanks for the help! -Ray