Hi,
I am working on Ubuntu 20.04.6 LTS with the ATM’22 dataset. I have the CT volumes and the binary segmenatation mask of the pulmonary airway as nifty (.nii.gz) files. To get the centerline of the pulmonary airway, I use following steps:
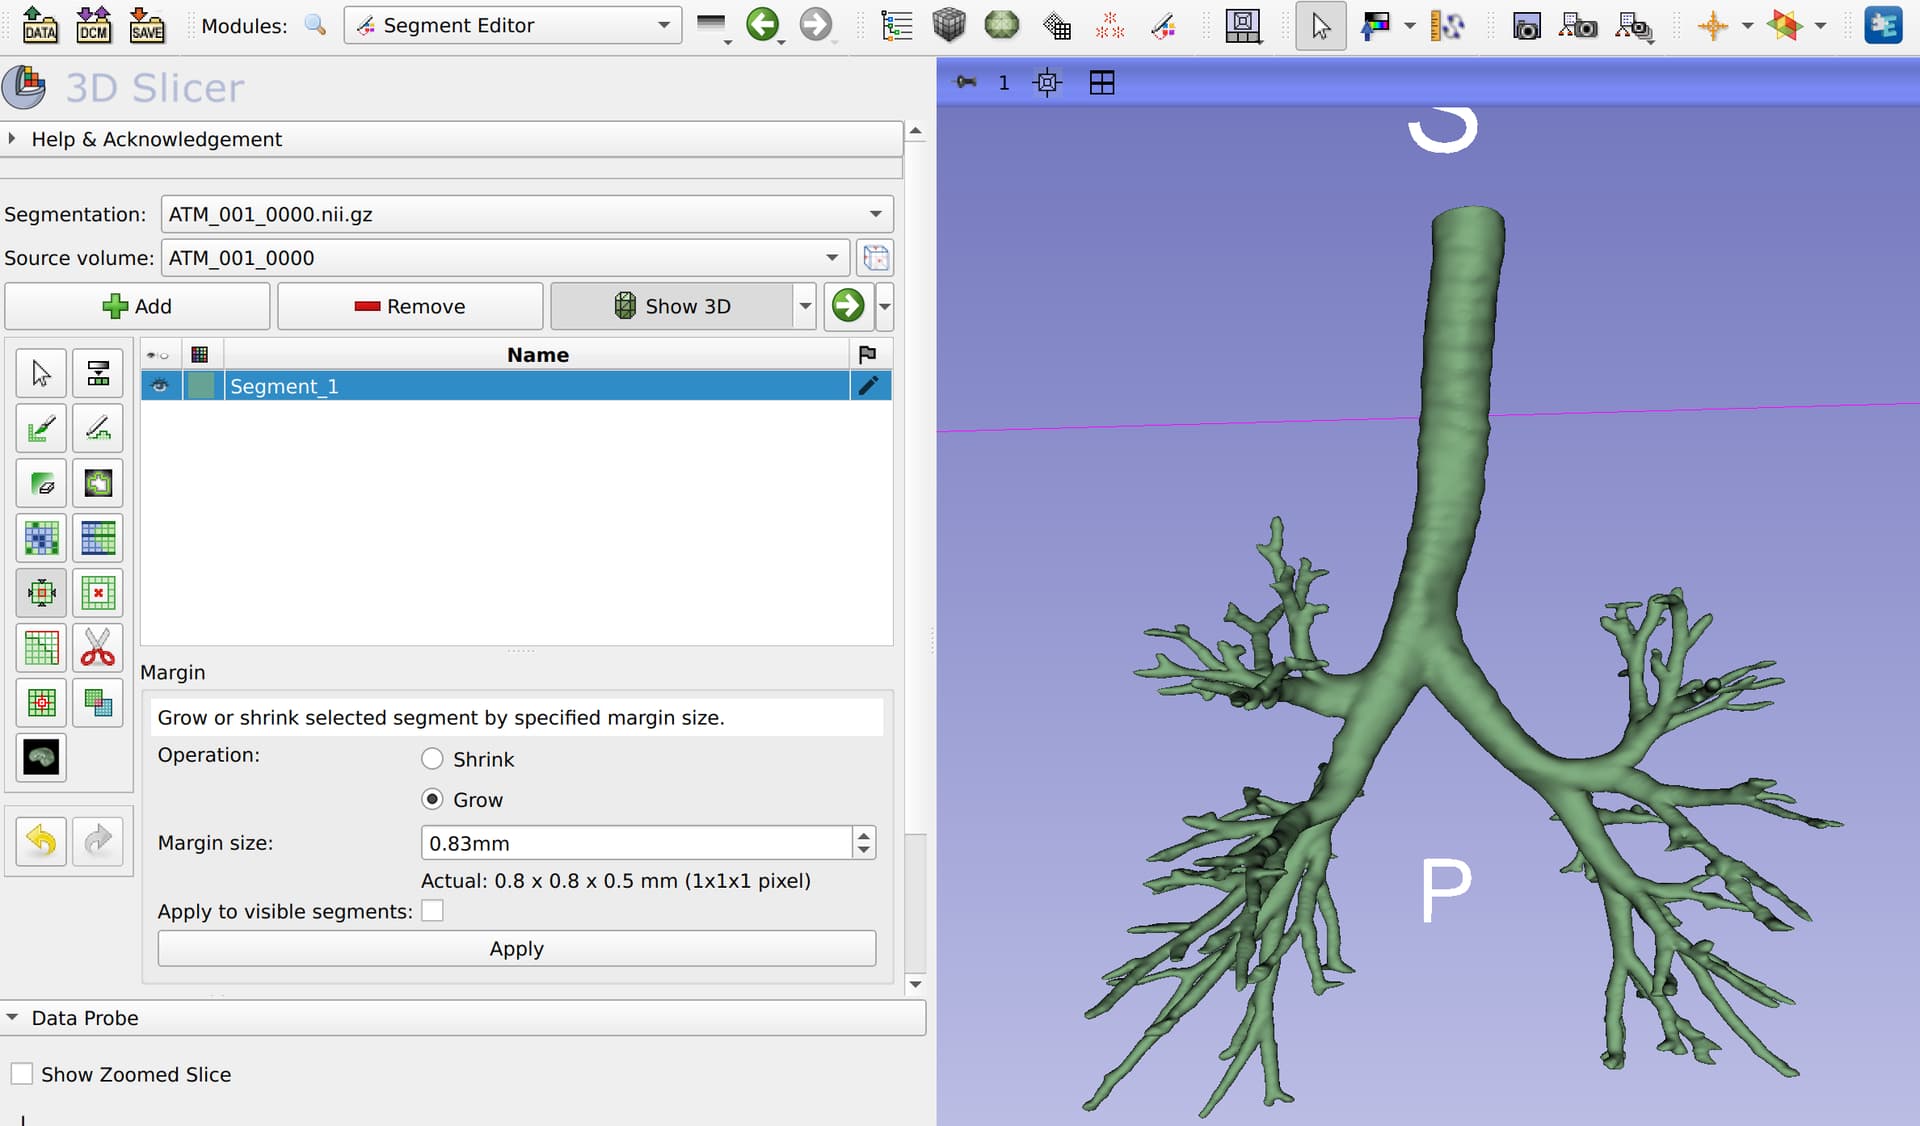
- Load the image volume as normal volume and the segmentation volume as a segmenation.
- Apply a growing operation on the segmentation mask using the segment editor.
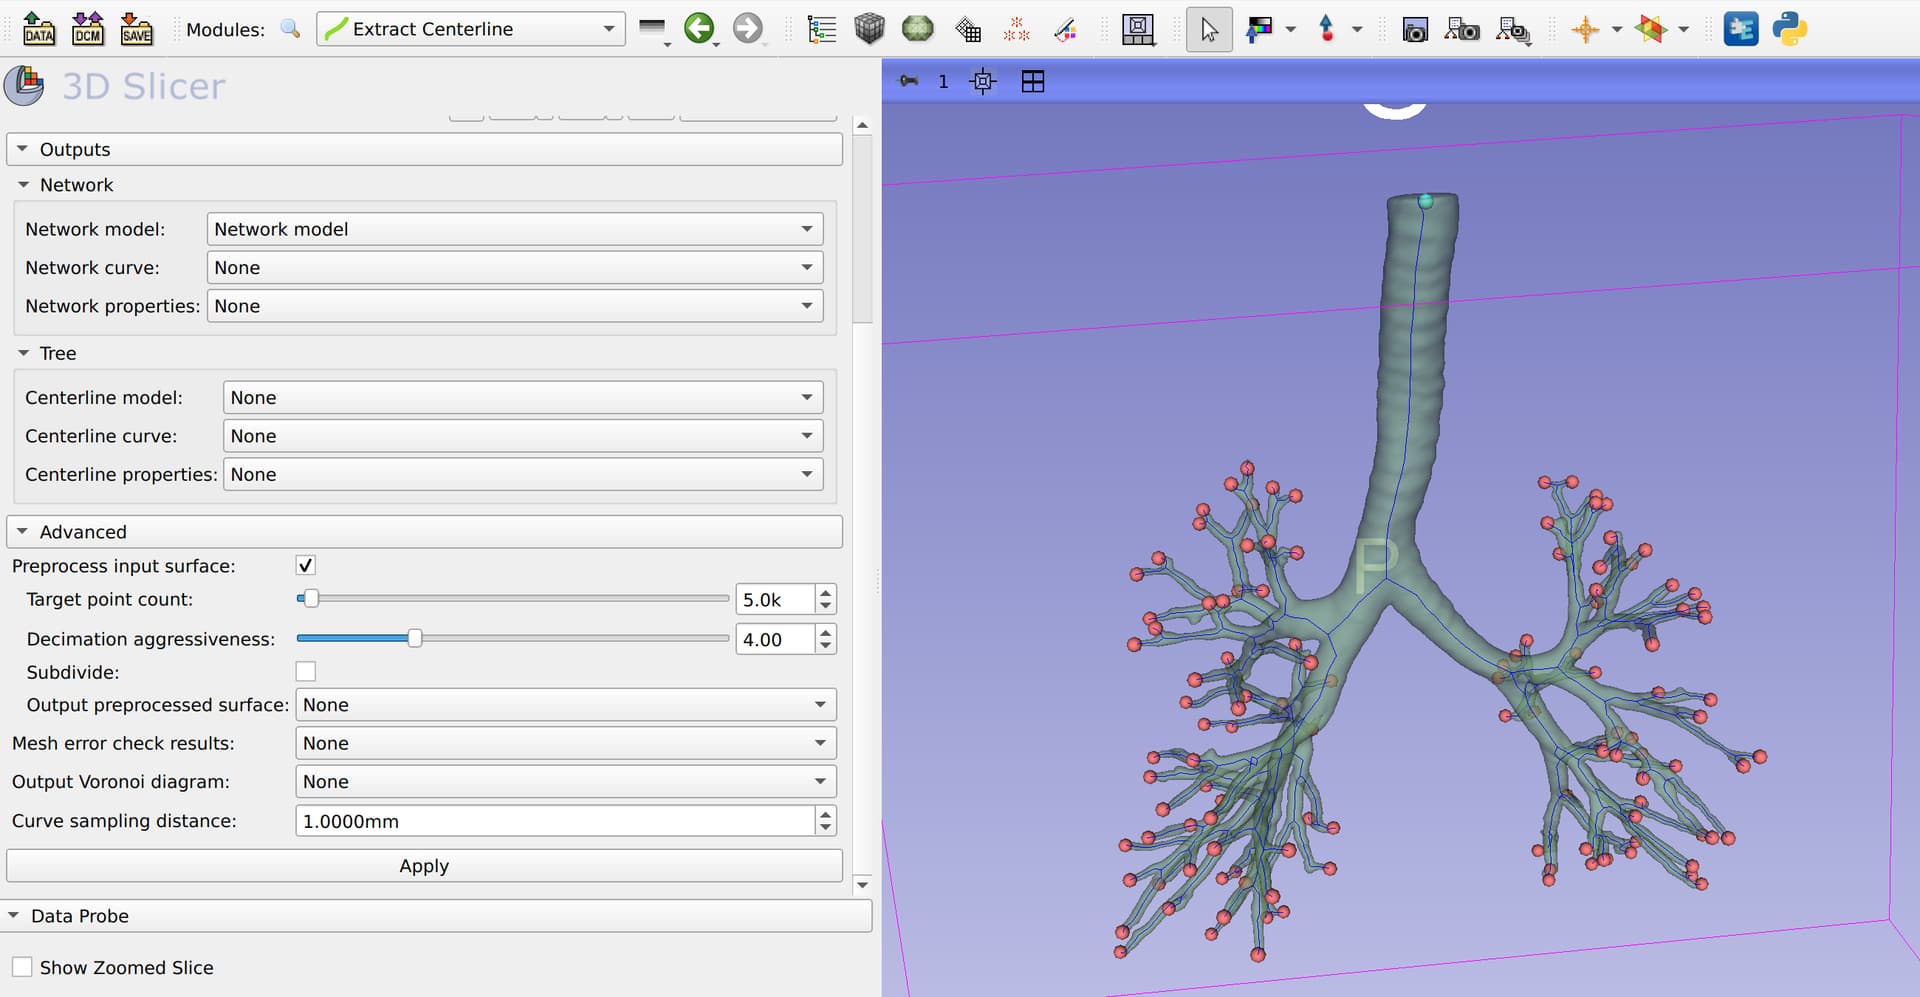
- Load the Extract Centerline module of the Vascular Modeling Toolkit (VMTK).
3.1. Select the segmentation mask as my Surface and run Auto-detect for the endpoints.
3.2 Create a new network model and click apply to get the centerline.
- Save the centerline network model as a vtk file.
I have to repeat the same steps for many files, and I would like to use a Python script to achieve this. So far I have the following:
import vtk
import slicer
import ExtractCenterline

# 1. load volume and segmentation

volume = slicer.util.loadVolume("volume.nii.gz")
seg = slicer.util.loadSegmentation("segmentation.nii.gz")
segmentation = seg.GetSegmentation()
# This creates the 3D view
seg.CreateClosedSurfaceRepresentation()
segmentID = segmentation.GetSegmentIdBySegmentName('Segment_1')
# create empty vtkPolyData object
segmentVtkPolyData = vtk.vtkPolyData()
# Get vtkPolyData representation of segment surface into segmentVtkPolyData variable
seg.GetClosedSurfaceRepresentation(segmentID, segmentVtkPolyData)

# 2. Apply a growing operation
#I am not sure how to do this

# 3.1. Auto-detect the endpoints
# Here I think the code from onAutoDetectEndPoints() should be used, is that correct?
[onAutoDetectEndPoints()](https://github.com/vmtk/SlicerExtension-VMTK/blob/3787ea4a300da28ec5f0824f0715f2713b631155/ExtractCenterline/ExtractCenterline.py#L323)

end_pts = []

# 3.2. Extract the centerline
# Here I think the code from onApply() should be used, but I found the following code at
# (https://discourse.slicer.org/t/vmtk-extract-centerline-with-python-console/31596/8)
# should I use this or the code from onApply()?
[onApply()](https://github.com/vmtk/SlicerExtension-VMTK/blob/3787ea4a300da28ec5f0824f0715f2713b631155/ExtractCenterline/ExtractCenterline.py#L230)

# get the centerline logic object
extractLogic = ExtractCenterline.ExtractCenterlineLogic()
# preprocess the polydata
inputSurfacePolyData = extractLogic.polyDataFromNode(seg, segmentID)
preprocessEnabled = True
targetNumberOfPoints = 5000.0
decimationAggressiveness = 4.0
subdivideInputSurface = False
preprocessedPolyData = extractLogic.preprocess(
    inputSurfacePolyData,
    targetNumberOfPoints,
    decimationAggressiveness,
    subdivideInputSurface,
)
centerlineCurveNode = slicer.mrmlScene.AddNewNodeByClass("vtkMRMLMarkupsCurveNode", "Centerline curve")
centerlinePolyData, voronoiDiagramPolyData = extractLogic.extractCenterline(
        preprocessedPolyData, end_pts, curveSamplingDistance=0.001)

# 4. Save the centerline
# Again, I don't know how to export the centerlinePolyData as a .vtk file
I would also like to know how to run a .py file in slicer? Do I need to create a new module, and use the .py file that it generates. Ideally I would like to be able to debug the file using Pycharm. I managed to attached Pycharm’s remote debugger to 3D Slicer’s Python console using the instructions here, but the instructions at one point say
Load your .py file and add breakpoints (menu: Run / Toggle Line Breakpoint) where you want your execution to stop for debugging.
but does not explain how to actually run the python script.
I would appreciate any help with this.
This code may be an adequate example for a growing operation with the ‘Segment editor’.
Thanks. I have managed to get the centerline using the following code.
# Reference: https://discourse.slicer.org/t/vmtk-extract-centerline-with-python-console/31596/8
# 1. load volume and segmentation
print("Loading volume and segmentation:", volume)
vol = slicer.util.loadVolume(vol_path)
seg = slicer.util.loadSegmentation(seg_path)
seg.CreateClosedSurfaceRepresentation()  # This creates the 3D view

# 2. Apply a growing operation
# Reference: https://discourse.slicer.org/t/include-a-manual-segment-editor-effect-in-a-module/17464
# Reference: https://github.com/vmtk/SlicerExtension-VMTK/blob/e9aa8e7e532299c10cfae5746e9c7ef06a4314b1/ArterialCalcificationPreProcessor/ArterialCalcificationPreProcessor.py#L271
print("Applying growing operation")
segmentEditorWidget = slicer.qMRMLSegmentEditorWidget()
segmentEditorWidget.setMRMLScene(slicer.mrmlScene)
segmentEditorNode = slicer.mrmlScene.AddNewNodeByClass("vtkMRMLSegmentEditorNode")
segmentEditorWidget.setMRMLSegmentEditorNode(segmentEditorNode)
segmentEditorWidget.setSegmentationNode(seg)
segmentEditorWidget.setSourceVolumeNode(vol)

# Grow by margin within intensity range.
segmentEditorWidget.setActiveEffectByName("Margin")
effect = segmentEditorWidget.activeEffect()
effect.setParameter("ApplyToAllVisibleSegments", str(0))
effect.setParameter("MarginSizeMm", str(0.83))
effect.self().onApply()

# 3.1. Auto-detect the endpoints and extract the centerline
extractCenterlineWidget = ExtractCenterline.ExtractCenterlineWidget()
# get segment ID
segmentation = seg.GetSegmentation()
segmentID = segmentation.GetSegmentIdBySegmentName('Segment_1')
# Set the parameters
extractCenterlineWidget._parameterNode.SetNodeReferenceID("InputSurface", seg.GetID())
extractCenterlineWidget._parameterNode.SetParameter("InputSegmentID", segmentID)
extractCenterlineWidget._parameterNode.SetParameter("TargetNumberOfPoints", str(5000.0))
extractCenterlineWidget._parameterNode.SetParameter("DecimationAggressiveness", str(4.0))
extractCenterlineWidget._parameterNode.SetParameter("CurveSamplingDistance", str(0.001))
extractCenterlineWidget._parameterNode.SetParameter("PreprocessInputSurface", "true")
extractCenterlineWidget._parameterNode.SetParameter("SubdivideInputSurface", "true")

extractCenterlineWidget.onAutoDetectEndPoints()
endPointsMarkupsNode = extractCenterlineWidget._parameterNode.GetNodeReference("EndPoints")

# 3.2. Extract the centerline
# Setting network nodes
# For extracting the network model
networkModelNode = slicer.mrmlScene.AddNewNodeByClass("vtkMRMLModelNode",
                                                          slicer.mrmlScene.GetUniqueNameByString("Network model"))
networkModelNode.CreateDefaultDisplayNodes()
extractCenterlineWidget._parameterNode.SetNodeReferenceID("NetworkModel", networkModelNode.GetID())
# For extracting the network curve
networkCurveNode = slicer.mrmlScene.AddNewNodeByClass("vtkMRMLMarkupsCurveNode",
                                                      slicer.mrmlScene.GetUniqueNameByString("Network curve"))
networkCurveNode.CreateDefaultDisplayNodes()
extractCenterlineWidget._parameterNode.SetNodeReferenceID("NetworkCurve", networkCurveNode.GetID())
# For extracting the network properties
networkPropertiesNode = slicer.mrmlScene.AddNewNodeByClass("vtkMRMLTableNode",
                                                      slicer.mrmlScene.GetUniqueNameByString("Network properties"))
extractCenterlineWidget._parameterNode.SetNodeReferenceID("NetworkProperties", networkPropertiesNode.GetID())

extractCenterlineWidget.onApplyButton()
In Slicer GUI there is an option to export the network curve as a Markups JSON file with options to include children and retain hierarchy. How can I do this using the python script? I would also like to export the network model as a VTK file and the end points as a JSON file, How can I do that?
I can save the nodes as follows.
# Create network model storage node
networkModelStorageNode = networkModelNode.CreateDefaultStorageNode()
networkModelStorageNode.SetFileName(os.path.join(network_save_path, file_name + ".vtk"))
networkModelStorageNode.WriteData(networkModelNode)
but I still cannot figure out how to save the network curve in heirachical folder structure as possible in GUI. Any help would be appreciated.
The code for saving the network curve with required folder structure is linked here.