Are you segmenting from a CT volume or have you just imported an STL model?
If you are segmenting from a CT volume then in segment editor you can use the smoothing effect with the smoothing method set to “Closing (fill holes)”. Try different sized kernels, the bigger the kernel, the more holes are filled. Just be careful not to have it so high that you fill too many foramen holes/other anatomical holes which are supposed to be there. Depending on how patient you are then you can also manually paint in areas of sketchy bone in the 2D slice windows.
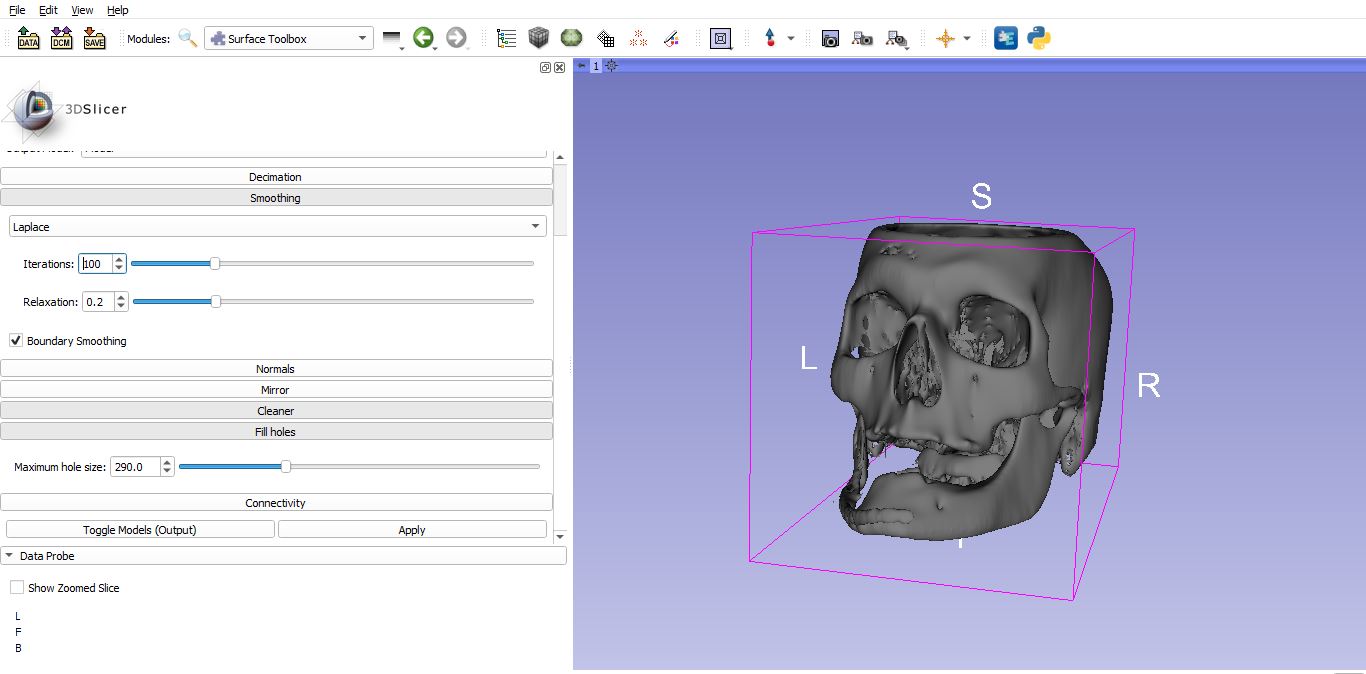
If you are worried about there being lots of holes around the orbital walls and the sinus bones then this is a more difficult problem to solve. These bones are notoriously difficult to segment because they are so thin (down to around 0.5mm thick) their hounsfield units are very susceptible to being under-represented due to partial volume effects.
To get the best results you need a scan which has small voxels i.e. small field of view and small slice thickness. Then you can use the instructions on this post to get a slightly better segmentation: Enhancing orbital walls with Unsharp mask filtering
In the past if I want a skull model with nicely defined orbital walls then I first segment the skull from the main volume. Then I will crop out a volume for each orbit using two ROIs, then perform the unsharp mask image filter on these volumes, segment the orbital bones in separate segments, then combine these segments back into the original segment. This is easier than performing unsharp mask filtering on the whole original volume because the filter does have some negative side effects such as rasing the HU units of the skin etc.
By the way where did you source the volume from? If it is open to the public then I would be keen to have a copy as it would be good to have a mandibulectomy sample volume.
To tell you the truth a lot of what you said is yet a bit unknown to me, so i’ll take some time to fully comprehend and try it.
Regarding the ct scan, i’m positive that i found it on embodi3d.com, but i just can’t seem to find it again. I’ll try to attach a link here from google drive. CTskull.nrrd
If you manage to succeed with this skull, please share it as well.
Some comments about the quality of this file would be appreciated too. (Like if it’s possible to have a nice final model)
Thanks for the link, That is a strange looking mandibulectomy! The bar looks like it is protruding from the skin!
That volume is not ideal for capturing the small details of the sinus bones so it is no wonder that there are lots of holes in the eye orbits. If you open the volume, then go to the Volumes module, then expand the volume information area you can see the image spacing values in there. The first two values are 0.556mm x 0.556mm which is the size of the voxels in the axial plane. This suggests that this was an axial CT scan with a field of view of about 285mm with a 512 matrix (0.556mm x 512 = 285mm).
The spacing in the z direction (Superior-Inferior) is 2mm which indicates that the slice spacing was 2mm.
If you go down to the display area in the volume module you can untick the interpolation box which allows you to visualise the voxels more easily in the 2D slice views.
Most of the scans I deal with for imaging orbital bones have a field of view of around 200mm so in plane voxel size of around 0.35 - 0.4mm and a slice thickness of 0.5mm - 1mm. This gives much better results that this volume.
You will need more that the fill holes tool to salvage a low resolution volume like this. You may see some improvement with Unsharp mask image filtering as described in the link above. You could also experiment with the shrink wrap segment effect that @lassoan mentioned.
Yes it is rather a complicated process. Read as much as you can in the linked topic above and follow some of the links to the masters thesis etc and post any remaining questions that you have on here.