How to use Python to achieve the thresholding effect of the ‘Volumes’ module? (synchronized with the volume rendering)

Hi there,
I’m new to 3D Slicer.
Currently, I am trying to develop a python scripted module in 3D Slicer.
One of the features is to control the threshold of the volume rendering image through a slider.
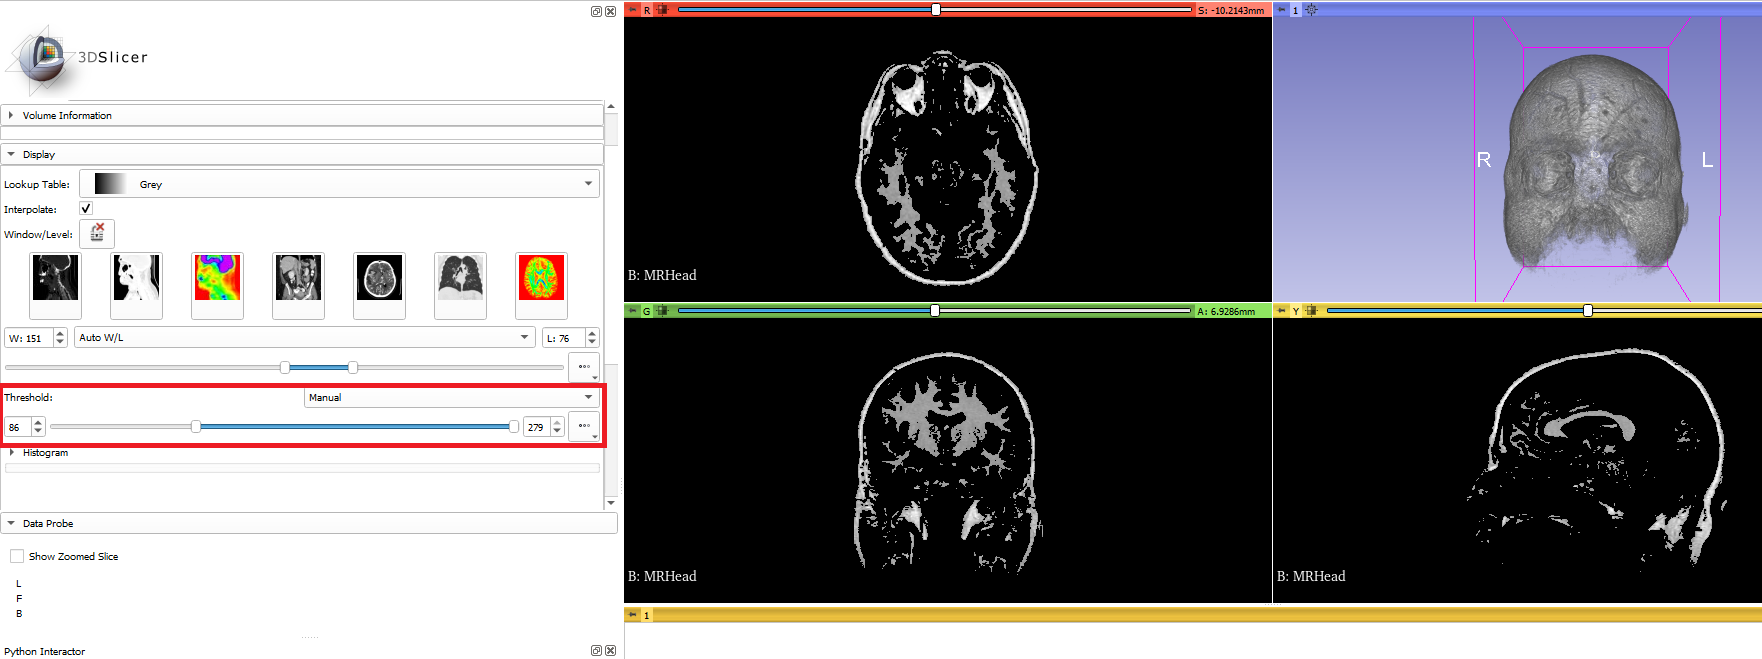
In other words, I want to use python to achieve the same effect as the ‘Threshold’ slider in the ‘Volumes’ module.
As shown in the picture is my goal:


Under the premise that the value in the check box on the right is set to ‘Manual’ and the ‘Synchronize with Volumes module’ in the ‘Volume Rendering’ module is checked, the user can see the volume rendering image synchronized with the slider.

I found that the ‘Volumes’ module is a Loadable module written in C++. How can I achieve my target effect with python(Just for this single feature)?

I have found the corresponding method (C++) for ‘Threshold’ in the ‘Volumes’ module according to the prompts on this page: https://slicer.readthedocs.io/en/latest/developer_guide/python_faq.html#how-to-find-a-python-function-for-any-slicer-features.

void qMRMLVolumeThresholdWidget::setAutoThreshold(int autoThreshold)
{
  this->setAutoThreshold(static_cast<ControlMode>(autoThreshold));
}

// --------------------------------------------------------------------------
void qMRMLVolumeThresholdWidget::setAutoThreshold(ControlMode autoThreshold)
{
  Q_D(qMRMLVolumeThresholdWidget);

  if (!d->VolumeDisplayNode)
    {
    return;
    }
  int oldAuto = d->VolumeDisplayNode->GetAutoThreshold();
  int oldApply = d->VolumeDisplayNode->GetApplyThreshold();

  int disabledModify = d->VolumeDisplayNode->StartModify();
  if (autoThreshold == qMRMLVolumeThresholdWidget::Off)
    {
    d->VolumeDisplayNode->SetApplyThreshold(0);
    }
  else
    {
    d->VolumeDisplayNode->SetApplyThreshold(1);
    d->VolumeDisplayNode->SetAutoThreshold(
      autoThreshold == qMRMLVolumeThresholdWidget::Auto ? 1 : 0);
    }

  if (!oldApply && autoThreshold == qMRMLVolumeThresholdWidget::Manual)
    {
    // Previously the threshold was turned off and now it is set to manual.
    // Since the default threshold range is VTK_SHORT_MIN to VTK_SHORT_MAX,
    // we don't want these values to appear on the GUI but instead set
    // the threshold range to the full scalar range of the volume (because
    // this corresponds to the previous state of the thresholding: having
    // the full scalar range of the volume in the threshold range).
    d->VolumeDisplayNode->SetThreshold(d->DisplayScalarRange[0], d->DisplayScalarRange[1]);
    }

  d->VolumeDisplayNode->EndModify(disabledModify);

  if (oldAuto != d->VolumeDisplayNode->GetAutoThreshold() ||
      oldApply != d->VolumeDisplayNode->GetApplyThreshold())
    {
    emit this->autoThresholdValueChanged(autoThreshold);
    }
}

However, I’m not sure if the above code(https://github.com/Slicer/Slicer/blob/c20e0a7849889e17224a5e605cc1df662b5ad977/Libs/MRML/Widgets/qMRMLVolumeThresholdWidget.cxx) is accurate or not and I’m confused about how to convert it into Python code next.

In addition, I also found another method by searching online:
displayNode->SetFollowVolumeDisplayNode(follow ? 1 : 0);
How can I integrate it into my code?

The following is the code of the slider I implemented in Python, FYI:

    #
    # thresholdRangeSlider
    #
    self.thresholdRangeSlider1 = ctk.ctkRangeWidget()
    self.thresholdRangeSlider1.minimum = 0.0
    self.thresholdRangeSlider1.maximum = 3522.0
    self.thresholdRangeSlider1.singleStep = 0.1

    self.thresholdRangeSlider1.minimumValue = 10.0
    self.thresholdRangeSlider1.maximumValue = 3522.0
    parametersFormLayout.addRow("Thresholds:", self.thresholdRangeSlider1)
    
    # connections
    self.thresholdRangeSlider1.connect('currentNodeChanged(vtkMRMLNode*)', self.onSlider)
    

    # Custom function
    def onSlider(self):
    

Should I implement my target feature in the custom ‘onSlider’ function? is that right? In addition, I am not sure whether the first parameter’currentNodeChanged(vtkMRMLNode*)’ in the ‘connect’ method is correct.

If possible, could you please give me some specific guidance to help me run in the right way, thank you very much for your help in advance!

Best regards,
Charles

This is surprisingly hard to track down. This documentation page has a lot of information on how to set up and customize volume rendering: Volume rendering — 3D Slicer documentation

However, there do not appear to be simple convenience functions reproducing what the “Shift” slider in the Volume Rendering module does. As far as I have been able to follow it, changing the slider value sends a signal to the VolumePropertyNodeWidget, calling moveAllPoints(xOffset, yOffset, False). VolumePropertyNodeWidget in turn calls VolumePropertyWidget -> moveAllPoints(xOffset, yOffset, False). At that point we move outside the Slicer github code base because VolumePropertyWidget is actually a ctkVTKVolumePropertyWidget (code here). moveAllPoints here calls a moveAllPoints function in a ScalarOpacityWidget and a ScalarColorWidget. I haven’t yet found the code which will be run by the ScalarOpacityWidget or the ScalarColorWidget, but I think it’s clear that the ultimate result will be moving all of the control points of the scalar opacity transfer function and the scalar color transfer function by an xOffset amount based on the location of the Shift scalar. This is going to have to occur through changes in the VolumeProperty of the VolumePropertyNode. The volume property node is a MRML node that you can explore in the python interactor. For example, set your rendering preset to 'MR-Default' and then type volPropNode=getNode('MR-Default') in the python interactor. volProp = volPropNode.GetVolumeProperty() gets the vtkVolumeProperty. volProp.GetScalarOpacity() reveals that the scalar opacity is a vtkPiecewiseFunction (documentation here). Again, there is no convenience function for shifting all the control points, but it looks like you can get the value at control point nodes using GetNodeValue(). As an approach, you could collect all the current values at control point nodes, remove all the points, and then add them back in a shifted location. So far, I’m not seeing any easier way to accomplish this.

Hello Mike,
Thank you very much for your quick and kindly reply. You mentioned a lot of knowledge points that I have not learned before, and I will refer to them. I realize that to implement this seemingly simple function seems to have to learn a lot…
Hello @lassoan @jamesobutler, do you have any comments on my issue? Or do I need to add an observer or something like that to do it? Could you please give me more guidance? Thank you so much!

As a supplement:
It seems that the slider in the ‘Volumes’ module affects the appearance of the volume rendering image actually by affecting the threshold range of the image data (as shown in the 3 slice windows).

sample image3

From this perspective, the function of this slider is actually similar to the sliders above the 3 slice windows that can be used to adjust the positions of slices in real-time. However, what I want is to enable the volume rendering image can be updated in real-time.

I put together a working python function which allows shifting scalar opacity in a similar way to moving the “Shift” slider.

Hopefully this will be helpful. I tried it out and it worked well for me. It isn’t linked to a slider, but the basic functionality is there.

Hello Mike,
Thank you so much! I will take a reference :+1:

Sorry, it looks like I messed up the link to the gist above. This was my first time trying that and it looks like I copied a javascript embedding link instead of just a link to the gist. Try this one instead:

1 Like

You should be able to interact with the VolumeDisplayNode as easily as shown here:

https://slicer.readthedocs.io/en/latest/developer_guide/script_repository.html#turning-off-interpolation

vtkMRMLScalarVolumeDisplayNode has several functions to set / change threshold and level.

1 Like

It looks like I also misread your initial question as pertaining to the volume rendering “Shift” slider when you wrote that you were interested in the threshold slider of the Volumes module. My mistake! As @rbumm pointed out, there are very easy ways to set those values. The only thing I would add is that you can get the display node for your volume of interest using GetDisplayNode(). For example:

volumeName =  "MR_Head" # replace with the name of your volume
volNode = getNode(volumeName)
dispNode = volNode.GetDisplayNode()
lowerThreshValue = 100 # for example
upperThreshValue = 500 # for example
dispNode.SetThreshold(lowerThreshValue, upperThreshValue)
2 Likes

Dear Bumm, Mike
Thank you for your guidance! Now I can change the threshold value of the displaynode(Volume rendering image) by running this piece of code in my Python console.

volumeName = “MR_Head” # replace with the name of your volume
volNode = getNode(volumeName)
dispNode = volNode.GetDisplayNode()
lowerThreshValue = 100 # for example
upperThreshValue = 500 # for example
dispNode.SetThreshold(lowerThreshValue, upperThreshValue)

I think the next thing I’m trying to do is to achieve that it(display node’s threshold) changes dynamically while adjusting the slider.

I will take a reference of the shiftVolumeRenderingGist.py you provided to do this.
By the way, is this script( shiftVolumeRenderingGist.py) achieved the slider thing?
Maybe I need an observer to do it? Cause I’m still not familiar with how to do this in python.
So, If there are some other suggestions/useful scripts that can help me to do changing the parameters in real-time via the slider (In my case, the parameter is the threshold value of the display node) please let me know. Thank you so much!!!

This should work for you:

volumeName = 'MR_Head' # replace with the name of your volume
volNode = getNode(volumeName)

# Define function that will update the thresholds for a given volume
def updateThresholdOnVolume(volNode, lower, upper):
  displayNode = volNode.GetDisplayNode()
  displayNode.SetThreshold(lower, upper)

# Set up a version of the function where the volume node has already been suppled 
updateThreshold = lambda lower, upper: updateThresholdOnVolume(volNode, lower, upper)
# Create GUI widget to control thresholds
windowLevelWidget = slicer.qMRMLWindowLevelWidget()
# Connect it with the image volume (so auto thresholding and automatic ranges will work correctly)
windowLevelWidget.setMRMLVolumeNode(volNode)
# Connect the 'windowLevelValuesChanged' signal with the updateThreshold callback
windowLevelWidget.connect('windowLevelValuesChanged(double,double)', updateThreshold)
# Make the widget visible
windowLevelWidget.show()

Documentation: Slicer: qMRMLWindowLevelWidget Class Reference

Hello Mike,
Thank you for your reply!
I tried the code you just provided in my python console.
Now I can see a slider, and the slices in the other three slice views can be changed accordingly. That’s cool!
However, the volume rendering image located in the upper right seems still hasn’t changed.

effect1
effect2

Do you know how to fix it? is the issue with the ‘displayNode’?
Thank you very much!

Hi, thanks for this suggestion. However, it only works partially. Here’s what’s happening in my case:
I added a shortcut that calls this code. When I press the shortcut-key, I see that in the GUI the threshold slider has moved to those values, however, the appearance in the Red, Green, and Yellow slices have not been updated. To make the views update I need to manually nudge the threshold slider in the GUI.

Any idea why this is happening?

Providing a link to where a solution was provided for @koeglfryderyk 's issue.

Hello Mike @mikebind ,
I tried the code above in my console, but there are still no changes with the volume rendering image, do you have any comments and guidance about this? how can I change the visible threshold of the volume rendering image on the upper right based on the code you provided? I think I’m close to it.
Thank you so much!

In the Volume Rendering module, make sure this box is checked

image

You could do this in code by adding the line displayNode.ApplyThresholdOn() to the updateThresholdOnVolume function above.

2 Likes

Hello Mike,
It’s working! Thank you so much for your help!

Best regards,
Charles

1 Like

Hello Mike,
I also tried the code you mentioned above in the python console of slicer:

volumeName = 'MR_Head' # replace with the name of your volume
volNode = getNode(volumeName)

# Define function that will update the thresholds for a given volume
def updateThresholdOnVolume(volNode, lower, upper):
  displayNode = volNode.GetDisplayNode()
  displayNode.SetThreshold(lower, upper)

# Set up a version of the function where the volume node has already been suppled 
updateThreshold = lambda lower, upper: updateThresholdOnVolume(volNode, lower, upper)
# Create GUI widget to control thresholds
windowLevelWidget = slicer.qMRMLWindowLevelWidget()
# Connect it with the image volume (so auto thresholding and automatic ranges will work correctly)
windowLevelWidget.setMRMLVolumeNode(volNode)
# Connect the 'windowLevelValuesChanged' signal with the updateThreshold callback
windowLevelWidget.connect('windowLevelValuesChanged(double,double)', updateThreshold)
# Make the widget visible
windowLevelWidget.show()

But I found that the ‘windowLevelWidget’ in the code actually implements the first slider in the Volumes module:
slider-1

However, I think their requirement is to implement the ‘Threshold’ slider below(The second slider):
slider-2

To do this, does it mean we just need to change the GUI widget here? If so, what should be changed to the ‘windowLevelWidget’? and what should be the first parameter in the ‘connect’ method?

Could you please point out how to do this?
Thank you very much!

Best regards,
Daniel

Good catch! I could have sworn I tested this out before posting, but apparently not well enough. The above snippet of code does indeed set the threshold values based on the slider values of the created widget (displayNode.SetThreshold() is the correct function for that), but it simultaneously also sets the window and level values (through some sort of automatic linkage between a qMRMLWindowLevelWidget and the volume node you associate with it, I presume). The resulting behavior is sub-optimal :slight_smile:

Luckily, it is easy to set right. As you anticipated, we just need to change the widget we create. The correct widget is qMRMLVolumeThresholdWidget(). Because of the automatic linkage, once we associate the volume node we don’t need to connect the updateThreshold() function, the volume displays will already dynamically update with changes to the slider.

volumeName = 'MR_Head' # replace with the name of your volume
volNode = getNode(volumeName)
thresholdWidget = slicer.qMRMLVolumeThresholdWidget()
thresholdWidget.setMRMLVolumeNode(volNode)
thresholdWidget.show()

For completeness, the signal you would need to connect to if you wanted to have an additional callback run when the threshold slider values are changed is 'thresholdValuesChanged(double,double)', but this is not necessary because of the automatic linkage once you set the associated volume node. Documentation available at Slicer: qMRMLVolumeThresholdWidget Class Reference.

Let me know if this doesn’t work for you or if there are further questions.

1 Like

Hello Daniel,
As you mentioned, I had the same problem before.
Like Mike just replied, based on the previous code, I changed qMRMLWindowLevelWidget to qMRMLVolumeThresholdWidget, and changed the first parameter of the connect method to thresholdValuesChanged(double, double). Then it worked!

Mike just replied a simpler way and it is also effective! :+1:
I hope this consultation can help you.

Best,
Charles