@jamesobutler @jcfr @lassoan @pieper

Could you point me to how I can enable interactive 3D cropping on a 3D rendering in 3D view with Python?
@jamesobutler @jcfr @lassoan @pieper
Could you point me to how I can enable interactive 3D cropping on a 3D rendering in 3D view with Python?
Here’s the recipe for finding the code to implement GUI features - it’s very powerful - it will help you better understand the code and find solutions to a lot of questions:
Also in this case there’s already useful information in the script repository, so its recommended to read through all the snippets there to save time in the future:
Thanks you Steve. That’s the best response ever. Teach me to fish. I’ll get my pole and tackle and get to work.

OK, I’m trying to get through the docs. I will keep struggling through them, but here’s where I am so far.
I’ve enabled cropping with this code…
   def enable3DCroppingUI(self, volumeNode):

    displayNode = slicer.mrmlScene.GetFirstNodeByClass("vtkMRMLViewNode")

    roiNode = slicer.vtkMRMLAnnotationROINode()
    roiNode.Initialize(slicer.mrmlScene)

    displayNode.SetAndObserveROINodeID(roiNode.GetID())
    displayNode.CroppingEnabled = True
Here’s what I get.

AttributeError: ‘MRMLCore.vtkMRMLViewNode’ object has no attribute ‘SetAndObserveROINodeID’
How do I get it to crop? It seems my ROI and/or cropping is not associated with the rendering. I’m almost there. Shall I play around with the code in the “CropVolumeSelfTest.py” function (found via @pieper recipe for finding the code)?
I am really excited about displaying this powerful Slicer capability to my physicians this week since they tell me the slice planes rendering is useless. They will be pleasantly surprised I think.
This comes up first when I initially turn on cropping. This has to be ROI related I think…

Here’s my code…
def enable3DCroppingUI(self, volumeNode):

    roi = slicer.vtkMRMLAnnotationROINode()
    roi.Initialize(slicer.mrmlScene)

    cropVolumeNode = slicer.vtkMRMLCropVolumeParametersNode()
    cropVolumeNode.SetScene(slicer.mrmlScene)

    cropVolumeNode.SetIsotropicResampling(True)
    cropVolumeNode.SetSpacingScalingConst(0.5)
    slicer.mrmlScene.AddNode(cropVolumeNode)

    cropVolumeNode.SetInputVolumeNodeID(volumeNode.GetID())
    cropVolumeNode.SetROINodeID(roi.GetID())

    cropVolumeLogic = slicer.modules.cropvolume.logic()
    cropVolumeLogic.Apply(cropVolumeNode)
I think your displayNode definition is wrong.
I think this could work:
   def enable3DCroppingUI(self, volumeNode):

    displayNode = slicer.modules.volumerendering.logic().GetFirstVolumeRenderingDisplayNode(volumeNode)

    roiNode = slicer.vtkMRMLAnnotationROINode()
    roiNode.Initialize(slicer.mrmlScene)

    displayNode.SetAndObserveROINodeID(roiNode.GetID())
    displayNode.CroppingEnabled = True
I don’t know if there are more mistakes in the above code.
Hello @mau_igna_06,
Thank you for the response. I tried that and as you implied, there are obviously other mistakes. Do you have or know of other slicer modules that successfully implement 3D cropping? How do you initially set up your 3D View? My renderings always includes the 3 slice planes. If you can help me to achieve this goal, that would be great.
I’m thinking the slice planes rendering is getting in the way, and maybe the ROI is using it.

In your image there you have both the volume rendering shown and also the slice intersections. You need to turn off/on slice intersections as you want. See this example of how to turn on slice intersections. Script repository — 3D Slicer documentation
@lassoan @jamesobutler @pieper
OK, after 5, 12 hour days in a row, I am still having the most difficult time getting my cropping ROI associated with my 3D View image. Can I pay someone to show look at my code and show me what I’m doing wrong? $$$ Sensing some desperation here? You’re right! This is clearly beyond my threshold of complexity. If you’re interested, we can take this off line and I’ll hire you. mail me at knufunk@live.com. This is not necessarily for work, just for my knowledge and then I’ll use my knowledge for work. Consider it a private lesson. An education.
I just want this functionality,
If it can’t be done, please let me know so that I can stop wasting my time. Thanks! ![]()
Hi @spycolyf, I don’t know all of your individual requirements, but addressing turning on the VolumeRendering crop ROI for interactive cropping in the 3D View these are the steps for learning how to do this task.
Starting with the Slicer script repository, Script repository — 3D Slicer documentation, provides information about how to use a specific ROI node for cropping in the volume rendering widget.
From this example we learn that we need a VolumeRenderingDisplayNode object to manipulate cropping. From another Slicer script repository example we learn how to get that object. There are different ways to do this, but I will use this existing example.
logic = slicer.modules.volumerendering.logic()
volumeNode = slicer.mrmlScene.GetNodeByID('vtkMRMLScalarVolumeNode1')
displayNode = logic.CreateVolumeRenderingDisplayNode()
displayNode.UnRegister(logic)
slicer.mrmlScene.AddNode(displayNode)
volumeNode.AddAndObserveDisplayNodeID(displayNode.GetID())
logic.UpdateDisplayNodeFromVolumeNode(displayNode, volumeNode)
A good method for making sure you get the correct object is to try things out in the Slicer python interactor and examine the type as such. Here we see that we currently have a special type of VolumeRenderingDisplayNode which is specific to GPU rendering and not the CPU type volume rendering. We can see how it inherits thing in its documentation.
>>> displayNode
(vtkSlicerVolumeRenderingModuleMRML.vtkMRMLGPURayCastVolumeRenderingDisplayNode)000001E46534FB28
From there a common technique I use is to see what options are available to the object that I have. Therefore I do “displayNode.[TAB]” where pressing the tab key after the dot will break up autocompletion of available methods and attributes for this object. It will show all inherited things as well. When viewing documentation online it usually shows only methods introduced in that object specifically and links to documentation of classes that it inherits. This method of searching is not always efficient, but it allows you to learn to see what is available and to try things out and explore the API.
I can find how to turn on the display node which shows the volume rendering in the 3D view.
displayNode.SetVisibility(True)
I can also scroll through the autocompletion and find that there is a method for turning on/off cropping.
displayNode.SetCroppingEnabled(True)
I also find the ROI Node associated with the volume rendering display node for cropping.
>>> displayNode.GetROINode()
(vtkSlicerAnnotationsModuleMRML.vtkMRMLAnnotationROINode)00000180F1134D08
From here I have learned that the ROI is a vtkMRMLAnnotationROINode type. Now I just need to figure out how to turn the visibility on for that ROI so it can be seen in the 3D view. I can search vtkMRMLAnnotationROINode documentation online or use tab completion on this object to look for methods to turn on visibility. Is it setVisible or VisibilityOn() or SetDisplayVisibility? I can search for methods like this.
I then find that for a vtkMRMLAnnotationROINode it is SetDisplayVisibility that is available and works to show the ROI in all the views including the slice views and 3D view.
displayNode.GetROINode().SetDisplayVisibility(True)
Putting everything together into a self contained example that can be pasted into the Python interactor upon starting Slicer.
import SampleData
sampleDataLogic = SampleData.SampleDataLogic()
volumeNode= sampleDataLogic.downloadMRHead()

logic = slicer.modules.volumerendering.logic()
displayNode = logic.CreateVolumeRenderingDisplayNode()
displayNode.UnRegister(slicer.mrmlScene)  # See https://www.slicer.org/wiki/Documentation/Nightly/Developers/Tutorials/MemoryManagement
slicer.mrmlScene.AddNode(displayNode)
volumeNode.AddAndObserveDisplayNodeID(displayNode.GetID())
logic.UpdateDisplayNodeFromVolumeNode(displayNode, volumeNode)

displayNode.SetVisibility(True)  # Volume Rendering shown in 3D view
displayNode.SetCroppingEnabled(True)  # Cropping Enabled
displayNode.GetROINode().SetDisplayVisibility(True)  # Show ROI used for cropping Volume Rendering
Here I’ve manually rotated the volume in the 3D view and clicked a control point on the ROI to crop the volume rendering.
Oh wow @jamesobutler! I am so grateful for your response and for making an attempt to help me out. I show onw physician/Radiologist this functionality in Slicer and he was blown away and said “Surgical Services would go nuts over this (in a good way).” I continue to be amazed by the lack of awareness of Kitware and Slicer in the medical imaging community. This will definitely expand that awareness here. Anyway, thanks so much for giving me a flashlight if you will. I’m eager to continue this endeavor. I’ll let you know my progress.
And thank you for showing me a little more about how to use the documentation and put things together.
Thanks to your response I was able to accomplish what I needed. Soon, I will post instructions describing all that I did to achieve my solution. I think it will help others.
Thanks so much!
Hello, do you know a way to reset the cropping ROI back to be fully enclosing as when initally created?
Thanks
You are describing the functionality of the following button in the GUI. Determining how to do this in Python would be a good practice if you haven’t already. I would suggest that you start by searching for the methods available in slicer.modules.volumerendering.logic(). There is a method name in the logic class that should pop out to you for doing this action.
ok thanks! @jamesobutler
Hello @jamesobutler,
Every advice you gave led me to success. Thanks You so much!
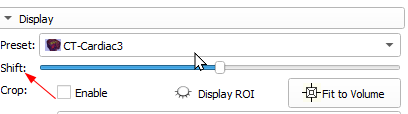
Now there’s one final (I think) thing that need to accomplish and I have sort of working, but it’s not smooth. I’m trying to implement the shift function in the following figure.
I’m changing the Gradient Threshold with the value of a slider (0 to 99). But, it’s pretty jerky (not smooth changes). It works best if I slide the slider slowly. What is the proper way to do this in Python? Do I need to add delays in the event handler to give the display time to catch up as I slide?
Here’s my code:
def updateRenderShift(self):

    # Here's where I assign the slider value (0 to 99) to the gradient threshold
    gradientThreshold = self.ui.RenderShiftSlider.value

    maxOpacity = 1.0
    gradientOpacityTransferFunction = self.displayNode.GetVolumePropertyNode().GetVolumeProperty().GetGradientOpacity()
    gradientOpacityTransferFunction.RemoveAllPoints()
    gradientOpacityTransferFunction.AddPoint(0, 0.0)
    gradientOpacityTransferFunction.AddPoint(gradientThreshold-1, 0.0)
    gradientOpacityTransferFunction.AddPoint(gradientThreshold+1, maxOpacity)
When I change the shift slider as you indicate in your picture when displaying the volume rendering of the MRHead sample data it is smooth for me. What GPU is being used when you observe that it is not smooth?
You can enter interactive rendering mode when you start moving the slider and exit when you release the slider (this is particularly effective if you use CPU volume rendering, and this is used in Volume rendering module to make the updates smoother).
You can also disable tracking in the slider, which make the slider only generate value changed events when the slider is released.


