Retain Image Color in Volume Rendering

I am looking to create a 3D model of a stack of images, retaining the original image color. See the screenshot as a reference.

By creating a segmentation with a threshold of 22 - 255 I am able to select the desired part and create a model, however, then the color becomes the label color. I’d like to create the exact same 3D model, except with the original colors.

Is this possible?

I have already consulted this tread, yet the code suggested there gives me errors (if a trace is useful I can provide that)

P.s. I’ve had quite a few issues with 4.11 on Linux; 1. I can’t load saved files, as this crashes the program, 2. I can’t use “Surface smoothing”, as that crashes the application. (4.10 gives me even more issues)

SetConversionParameter: Conversion parameter 'Collapse labelmaps' not found in converter rules!

SetConversionParameter: Conversion parameter 'Joint smoothing' not found in converter rules!

error: [/home/tyler/Downloads/Slicer-4.10.2-linux-amd64/bin/SlicerApp-real] exit abnormally - Report the problem.

If Slicer crashes then it is almost surely because you run out of memory. How large is your input image and how much physical RAM do you have and how much swap space have you configured?

Please also provide the trace for the error.

Have you tried it with the very latest Slicer Preview Release?

16GB of ram, no swap set up. Trace is here https://pastebin.com/qr5U16MJ

Memory usage goes up to 92% and then crashes.

Although that’s not my primary issue, do you have any clue whether original colored 3d models are possible?

Have you tried volume rendering? Slicer takes the LUT setting and window/level as a startpoint for the transfer function of the volume renderer

Screen Shot 2020-06-30 at 9.21.49 AM.png

1 Like

Yes, you should be able to color a model’s surface using a color volume using latest Slicer Preview Release. I’ll double-check if it works as expected.

Memory usage at 92% means there is a high chance of running out of memory. If you configure a few ten GB of swap space then it should take care of it.

What is the size and d your data set? What is the scalar type? (these are shown in Volumes module Volume information section)

The first thing I tried was volume rendering, but then I just get a black box, so I’m wondering how I can cut out the black parts.

Scalar type is unsigned char, and 1.2gb of 388 1080x1080 tiff images

This is my dataset : https://1drv.ms/u/s!AprYdPzSEdGHgpo5lgPqkwL-hQdi8g?e=xW1FPa

How did you create these images? Can you just export them as scalar volume? Then you could apply color mapping in Slicer, easily use volume rendering, etc. The problem really is that the color look-up is burnt into the image.

Ah hmm. I’m not sure, I didn’t create them. I’ll ask if that’s possible.

Is there any work around for these images?

If the colors are result of color imaging there is not much to do (then you probably want to use the original color) but if they are result of applying a color map (color look-up table) then it would be better to get the original scalar images.

Anyway, color volume rendering should work, too, as described in this post: Merge colored images and show them as 1 volume

I’ve downloaded your images and used this script to convert it to add an alpha channel and enable direct RGBA volume rendering (just copy-paste it into Slicer’s Python console after you loaded your data set):

# Find loaded vector volume
colorVolume = slicer.mrmlScene.GetFirstNodeByClass("vtkMRMLVectorVolumeNode")

# Convert RGB image to RGBA
luminance = vtk.vtkImageLuminance()
luminance.SetInputConnection(colorVolume.GetImageDataConnection())
append=vtk.vtkImageAppendComponents()
append.AddInputConnection(colorVolume.GetImageDataConnection())
append.AddInputConnection(luminance.GetOutputPort())
append.Update()
colorVolume.SetAndObserveImageData(append.GetOutput())

# Enable volume rendering
volRenLogic = slicer.modules.volumerendering.logic()
displayNode = volRenLogic.CreateDefaultVolumeRenderingNodes(colorVolume)
displayNode.SetVisibility(True)
# Enable direct RGBA color mapping
displayNode.GetVolumePropertyNode().GetVolumeProperty().SetIndependentComponents(0)

After slightly adjusting scalar opacity mapping in Volume rendering module and changing background to black I got this beautiful rendering:

A video created by Screen Capture module:

We plan to release Slicer5 soon and looking for nice images that could demonstrate capabilities of the application. Would you consider allowing this data set to be showcased as an image or video (with proper acknowledgments and reference to publication)?

Oh wow that looks really good, thanks!
I’ll ask at work if they are fine with that, I’ll let you know :slight_smile:

1 Like

I’ve been able to recreate the Volume, which is really cool. Now I am looking to export it of some sort (with the end goal of creating more complex animations)

Therefore I tried to segment it as I read from all the other treads you can’t export a volume rendering, however, is it possible to retain the color of the model in the segmentation?

I have referenced your answers here , yet was unsuccessful in creating a mesh with colors, is it possible to do this with this software?

1 Like

Volume rendering is a display technique, which produces a 2D color picture. There is nothing else that could be “exported”. See more detailed description here.

To display a volume like this, you need to use volume rendering. Blender can do everything, including volume rendering, but of course it is very complicated to achieve something like that is shown above. If you want to try it anyway then you can find some pointers here.

1 Like

Thanks a lot for the info, it is greatly appreciated. The BVTKNodes link you provided looks very interesting. The result of the sample set you provided looks really nice.

I am looking to give it a shot. If doesn’t take too much time, with the programs mentioned being Paraview, the BVTKNodes plugin, and Blender itself, what would be the general workflow here?

You should be able to load the volume directly into Blender and render it there.

1 Like

I have the same question @lassoan: is it possible to retain the color of the model in the segmentation?

I tried to use Probe volume with model, like you explain here, but my results were very “weird”.

This is the volume rendering of the segmentation:

This was the result with “Probe volume with model” > “Direct color mapping”:
image

Change from “Direct color mapping” to “color table”:
image

You would need to create a color map similar to the color transfer function that you use for volume rendering, but of course you will never get similar image quality with surface rendering as with volume rendering. This has been discussed previously in other topics, see for example here:

1 Like

Thank you @lassoan for your reply. Could you help me to create this color map? I’m new with 3d slicer :frowning:

For scalar (not RGB) volumes

You can copy the color transfer function to a color node by copy-pasting this into the Python console:

volumeRenderingPropertyNode = slicer.mrmlScene.GetFirstNodeByClass('vtkMRMLVolumePropertyNode')
colorNode = slicer.mrmlScene.AddNewNodeByClass('vtkMRMLProceduralColorNode')
colorNode.GetColorTransferFunction().DeepCopy(volumeRenderingPropertyNode.GetColor())

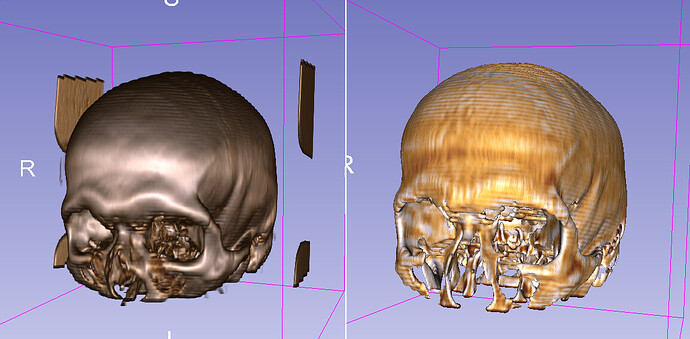
However, as I wrote above, do not expect surface rendering to even remotely similar to volume rendering, but something like this instead (left: volume rendering; right: surface rendering of probed surface):

The reason is that the texture/discoloration in the volume rendering is due to the cloud of lower or higher intensity voxels around the isosurface value, while in case of surface rendering the discoloration mainly comes from image interpolation artifacts (because if you segment by thresholding then you ideally get a surface where all the points have the exact same scalar value and any difference is due to small interpolation errors).

If you want a little bit more similar results then you can apply some Gaussian smoothing (using Gaussian Blur Image Filter module) to the input volume before you probe the volume with the model (that makes surrounding regions somewhat influence each point’s intensity):

For RGB volumes

If you have RGB volumes then you don’t need a colormap but you use direct color mapping. The fundamental difference between volume rendering/surface rendering still applies, and you’ll basically get a uniformly colored surface if you create segments by thresholding.

You must have chosen a wrong volume when you used Probe volume with model (not the RGB volume) if it came out like that in your screenshot. Try the probing again and if you cannot figure out what’s wrong then upload your scene as a .mrb file somewhere and post the link here.

I get this with the default red-green-blue colormap:

And this is what I see when I switch to direct mapping:

I’m not sure what your goal is, but I don’t think you can get realistic surface textures from the color in these cross-sectional images. If you want to see nice surface texture then it is better to take a photo of dissected organs and apply that texture to surface models.

2 Likes

Wow, thank you so much @lassoan ! Your answer will help me a lot, thanks again!

1 Like